



Ranger(Archer) SOLO build guide
By PhMestre · Updated Jul 2, 2026 · v1.00.17
[Wiki] Guide: Solo Explorer Archer Build (Late Game 80+)
This English guide focuses on optimizing the Explorer Archer for end-game content. The target is a fast, repeatable clear that reaches the instant-kill threshold on regular monsters while remaining comfortable against bosses.
1. Target attributes (Stats)
For a late-game character around level 80, build the offensive floor first and only add quality-of-life stats once clear speed is stable.
- Attack Speed: smooths the main attack loop and reduces time lost between targets.
- Physical and Projectile Damage: multiply both the retained active skill and basic attacks.
- Critical Chance / Damage: becomes valuable after the base physical package is reliable.
- Movement Speed: shortens travel time and improves farming efficiency.
| Priority | Attribute | Target / reason |
|---|---|---|
| 1 | Attack Speed | Reach a smooth, uninterrupted firing rhythm |
| 2 | Physical Damage % | Primary multiplier for skills and auto-attacks |
| 3 | Projectile Damage | Scales the Ranger's core damage family |
| 4 | Critical Chance | Add once consistent base damage is secured |
| 5 | Movement Speed | Reduce downtime between monster groups |
2. Equipment (Gears)
Use the strongest bow and off-hand combination available. Keep the loadout coherent: each item should improve the same physical-projectile damage loop instead of opening a second damage family.
Weapons & off-hands
Prioritize base weapon damage, Physical Damage %, Projectile Damage and Attack Speed. A lower-grade bow with the correct multipliers can outperform a higher-grade drop with unrelated bonuses.
Armor parts
Chest, helmet, gloves and boots should supply enough maximum HP for the stage, then convert remaining rolls into percentage damage. Gloves are the best place to solve an Attack Speed shortfall.
Jewelry (Accessories)
Rings, earrings, amulets and bracelets are flexible damage slots. Use Movement Speed only after the build reaches its clear-speed threshold.
| Equipment | Main rolls | Fallback |
|---|---|---|
| Bow / Arrow | Physical %, Projectile %, Attack Speed | Critical Damage |
| Armor parts | Max HP, Physical %, Attack Speed | Flat HP |
| Jewelry | Movement Speed, Critical Chance | Attack Damage |
3. Item customization
Inscription, decoration and engraving slots should reinforce the chosen damage package. Avoid spreading limited slots over unrelated defensive and elemental bonuses.
| Equipment type | Decoration / engraving | Inscription |
|---|---|---|
| Weapons | Physical Damage % | Physical Damage / Attack Speed |
| Armor | Max HP on 3–4 pieces, then HP % | Survival only when required |
| Jewelry | Movement Speed or Critical Chance | Attack Damage when below threshold |
Why Physical Damage %? It scales both the active skill and basic auto-attacks, so every offensive action benefits from the same investment.
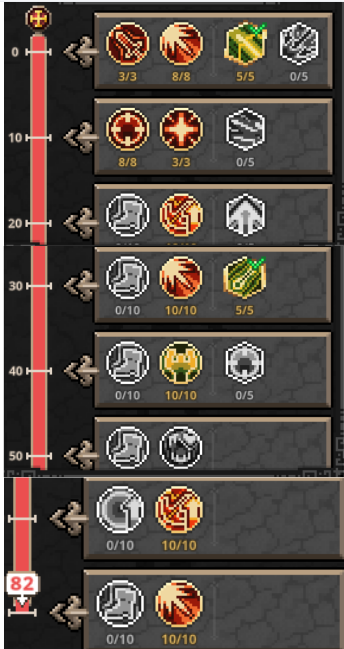
4. Skill tree
Core skills (leveling / progression)
- Rapid Fire: the primary active skill and first point priority.
- Piercing Arrow: the standard area-clear option for crowded stages.
- Projectile Damage Boost: the most direct passive multiplier.
- Attack Speed: important until the animation loop feels continuous.
Situational skill (boss swap)
Late-game skills
Elemental Dodge and Critical Damage are leftover-point choices. Do not delay the core physical and projectile nodes to obtain them early.
- Max the core active skill and projectile multiplier.
- Raise Attack Speed until the practical breakpoint.
- Add boss or survival tools for the stage being farmed.
- Spend remaining points on Critical Damage and utility.
5. Late-game checklist
- Normal monsters die in one volley.
- The boss swap is saved as a repeatable loadout.
- No equipment slot carries an unrelated damage family.
- Movement Speed is added only after the damage threshold is met.
More guides
Discussion
Local discussion preview. Votes stay in this browser; accounts and public moderation are not connected.

The equipment table makes the replacement order much easier to follow.